Binance Guide
Connect TradingView to Binance (Spot, Margin, and Futures) using TradeAdapter’s direct API integration — step by step.
Video walkthrough #
Binance + TradingView setup
1 — Create Binance API keys #
-
Log in to Binance
Go to binance.com and sign in to your account.
-
Open API Management
Navigate to Profile → API Management (or search “API” in the account menu). Click Create API and choose “System generated”.
-
Name your API key
Give it a descriptive label (e.g.
TradeAdapter). Complete the security verification (email + authenticator). -
Set permissions
Enable Spot & Margin Trading and/or Futures depending on the markets you plan to trade. Keep Enable Withdrawals unchecked — TradeAdapter never needs withdrawal access.
-
Restrict to TradeAdapter IP
Under IP access restrictions, select “Restrict access to trusted IPs only” and add:
35.75.198.16 -
Save your credentials
Copy your API Key and Secret Key. The Secret is shown only once — store it securely. You will paste both values into the alert message.
Futures testnet
To test Futures orders without risking real funds, create a separate API key on Binance Futures Testnet and use "real_order": "No". For Spot, test orders run on your real account but are simulated by Binance. Margin does not support test orders — use the smallest possible real order instead.
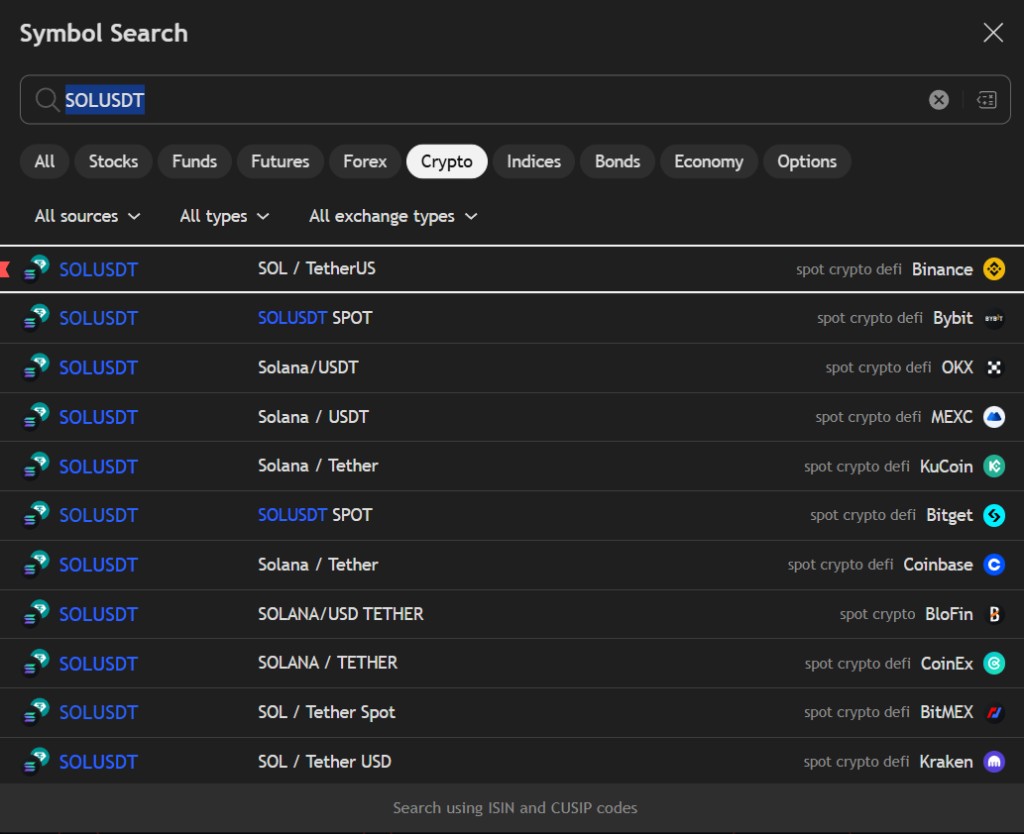
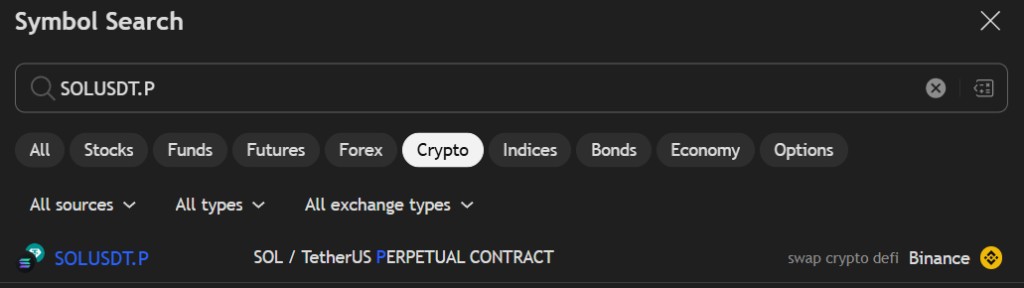
2 — Select the Binance symbol in TradingView #
Open TradingView and search for the symbol using the BINANCE prefix. Make sure you select the correct market type:
Search BINANCE:BTCUSDT, BINANCE:ETHUSDT, etc.
Search BINANCE:BTCUSDT.P or look for the Swap suffix.
Example — Spot
Example — Futures
Important
The {{ticker}} placeholder in your alert message sends this exact symbol name to Binance. If you pick the wrong symbol type (e.g. Spot instead of Futures), the order will fail or go to the wrong market.
3 — Add your indicator or strategy #
Load your Pine Script indicator or strategy onto the chart. This is what generates the trading signals.
Go to Pine Editor, paste your strategy code, and click “Add to chart”. Check the Strategy Tester tab to confirm backtesting results appear.
Add the indicator to the chart. It must use alertcondition() to fire signals. You’ll create one alert per action (Buy, Sell, TP, SL…).
Not sure which one you have? See Indicator vs Strategy.
4 — Configure order size #
Binance enforces strict minimum quantity and step size rules per symbol. Before creating the alert, make sure your order size meets these requirements.
How to set order size
If using a Strategy: go to strategy settings and set Order Size in “Contracts” to a value that fits the symbol’s minimum and step size. For example, to buy ~10 USD of DOGEUSDT at 0.07 USDT each, set contracts to 140 (0.07 × 140 ≈ 9.80 USDT).
If using an Indicator: you set the size manually via order_contracts in the alert message.
Check the exact filters for your symbol: Binance Supported Symbols — Spot
Enable BNB fee payment
Enable “Use BNB to pay for fees” in your Binance account settings. This prevents order rejections caused by insufficient balance when the fee is deducted from the traded asset, and gives you a 25% discount on trading fees. Learn more
5 — Create the TradingView alert #
Press Alt + A (or click the alarm clock icon) to create a new alert.
Under Condition, select your strategy. Set trigger to “Order fills only”. TradingView fills action, size, and price automatically.
Under Condition, select the specific signal (Buy, Sell, TP, SL…). You set order_action and order_contracts manually in each message.
Required: Webhook URL + Message
In the Notifications tab, enable Webhook URL and paste your personal webhook from your TradeAdapter profile. Then paste the JSON message (below) in the Message field.
Alert message formats #
Paste the appropriate JSON message into the alert’s Message field. Replace only the highlighted values — the {{...}} placeholders are filled automatically by TradingView when the alert fires.
For Strategy #
{
    "binance_api_key": "YOUR_API_KEY",
    "binance_secret": "YOUR_SECRET",
    "real_order": "No",
    "order_market": "Spot",
    "order_type": "Market",
    "isolated_margin": "No",
    "auto_rounding": "Yes",
    "exchange": "{{exchange}}",
    "ticker": "{{ticker}}",
    "time": "{{timenow}}",
    "order_contracts": "{{strategy.order.contracts}}",
    "order_action": "{{strategy.order.action}}",
    "order_price": "{{strategy.order.price}}",
    "market_position": "{{strategy.market_position}}",
    "market_position_size": "{{strategy.market_position_size}}",
    "prev_market_position": "{{strategy.prev_market_position}}",
    "prev_market_position_size": "{{strategy.prev_market_position_size}}"
}
Open Message Generator — Strategy
For Strategy with Take Profit / Stop Loss #
{
    "binance_api_key": "YOUR_API_KEY",
    "binance_secret": "YOUR_SECRET",
    "real_order": "No",
    "order_market": "Spot",
    "order_type": "Market",
    "isolated_margin": "No",
    "auto_rounding": "Yes",
    "tp_percent": "2",
    "sl_percent": "1",
    "exchange": "{{exchange}}",
    "ticker": "{{ticker}}",
    "time": "{{timenow}}",
    "order_contracts": "{{strategy.order.contracts}}",
    "order_action": "{{strategy.order.action}}",
    "order_price": "{{strategy.order.price}}",
    "market_position": "{{strategy.market_position}}",
    "market_position_size": "{{strategy.market_position_size}}",
    "prev_market_position": "{{strategy.prev_market_position}}",
    "prev_market_position_size": "{{strategy.prev_market_position_size}}"
}
Open Message Generator — Strategy with TP/SL
For Indicator #
{
    "binance_api_key": "YOUR_API_KEY",
    "binance_secret": "YOUR_SECRET",
    "real_order": "No",
    "order_market": "Spot",
    "order_type": "Market",
    "order_action": "buy",
    "order_contracts": "100",
    "isolated_margin": "No",
    "auto_rounding": "Yes",
    "exchange": "{{exchange}}",
    "ticker": "{{ticker}}",
    "time": "{{timenow}}"
}
Create one alert per action — duplicate the alert, change order_action to sell, and adjust order_contracts as needed.
Message fields explained #
| Field | Description |
|---|---|
binance_api_key |
Your Binance API Key (from Step 1) |
binance_secret |
Your Binance Secret Key (from Step 1) |
real_order |
"Yes" executes on Binance. "No" creates a test order (Spot: test on real account; Futures: uses Testnet). |
order_market |
"Spot", "Margin", or "Futures" |
order_type |
"Market" or "Limit" |
isolated_margin |
Only for Margin orders. "Yes" = isolated, "No" = cross. Keep "No" for Spot/Futures. |
auto_rounding |
Automatically rounds position size and price to fit Binance filters. Keep "Yes". |
tp_percent |
Take Profit percentage (Strategy + TP/SL only). e.g. "2" = 2%. |
sl_percent |
Stop Loss percentage (Strategy + TP/SL only). e.g. "1" = 1%. |
order_action |
Indicator: "buy" or "sell". Strategy: filled by {{strategy.order.action}}. |
order_contracts |
Indicator: quantity as a number. Strategy: filled by {{strategy.order.contracts}}. |
6 — Execute & monitor #
-
Start with test mode
Set
"real_order": "No"and let the first alert fire. Check your MyTrades page to see if the signal was received, executed, or rejected. -
Verify on Binance
For Spot test orders, Binance validates the request on your real account without executing it. For Futures, check the Futures Testnet order history.
-
Go live
Once confirmed, change
"real_order"to"Yes", delete the old alert, and create a new one with the updated message. The order will now execute on your real Binance account.
Symbol specifications #
Binance enforces minimum quantity, step size, and price filters per symbol. Check the full list before setting your order size to avoid rejections.
Min Qty, Step Size, Min Notional.
Min Qty, Step Size, Min Notional.
Min Qty, Step Size, Tick Size.
Important notes #
API security — Never share your Secret. Keep withdrawals disabled. Only whitelist the TradeAdapter IP (
35.75.198.16).
Recreate alerts after changes — If you modify Pine Script parameters, delete and recreate the alert. Editing an existing alert does not update placeholders.
Symbol must match — The TradingView chart symbol must correspond to a valid symbol on Binance for the selected market type.
Order size — Check Symbol Specifications to ensure your order meets Binance’s minimum quantity and step size.
All setup guides


